Pergola Setup Made Easy: Step-by-Step Overview to Enhance Your Exterior Room
Enhancing your exterior area with a pergola can bring a touch of elegance and peace to your home. Concern not, as this step-by-step guide will damage down the procedure into convenient tasks, making pergola installment simpler than you could think.
Select the Perfect Pergola Style
When picking the excellent pergola design, it is vital to take into consideration both aesthetic appeal and useful demands. A pergola is not simply an attractive structure; it serves a purpose in improving your outside space. Therefore, it is important to pick a style that not just complements your home's general aesthetic however additionally meets your certain requirements.
Primarily, take into consideration the dimension and form of your exterior space. A pergola must fit perfectly right into the existing landscape without overwhelming or overcrowding the location. Take measurements and evaluate the offered room to identify the proper measurements for your pergola.
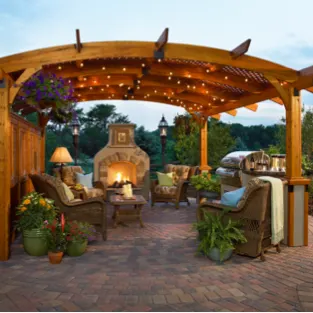
In addition, think about the products made use of in the building and construction of your pergola. Timber is a preferred option due to its natural elegance and longevity. Nonetheless, there are various options available, including vinyl and light weight aluminum, which need much less upkeep and use different visual designs.
Prepare Your Exterior Room
To make sure an effective pergola setup, it is important to effectively prepare your outdoor space. Prior to you begin the setup process, it is very important to analyze the location where you prepare to mount the pergola. Beginning by measuring the available area and establishing the ideal location for your pergola.
Next, clear the location of any type of particles, plants, or blockages that may disrupt the installment. Eliminate any type of existing frameworks or furnishings that might remain in the means. This will create a fresh start for the pergola installment.
As soon as the area is gotten rid of, it is important to level the ground. Uneven ground can create instability and influence the longevity of your pergola. Use a rake or a shovel to level the ground, removing any type of bumps or clinical depressions.
After leveling the ground, it is advised to mark the exact positioning of the pergola. This will guarantee that the installation is specific and straightens with your style vision. Usage stakes or spray paint to note the edges of the pergola.
Lastly, think about the surrounding landscape and exactly how it will match the pergola. You might intend to include plants, flowers, or illumination fixtures to boost the total aesthetic charm of your outdoor room.
Gather the Necessary Products and Tools
After effectively preparing your outdoor room, the following step in the pergola installation procedure is to gather all the necessary materials and tools. Having whatever you need in one location will save you time and ensure a smooth installment process. Here is a checklist of vital products and devices you will certainly require:
Pergola kit: Choose a pergola kit that suits your design and exterior space. Think about aspects such as size, layout, and material.
Lumber: Relying on the size of your pergola, you will require messages, braces, rafters, and light beams. See to it to choose premium and cured lumber for toughness and long life.
Fasteners: Use proper screws, nails, and brackets to secure the various parts of the pergola. Stainless-steel or galvanized fasteners are recommended for outside use.
Concrete mix: For stability, you will need to establish your pergola messages in concrete. Purchase a top quality concrete mix and follow the directions for proper mixing and pouring.
Tools: Collect crucial tools such as a drill, circular saw, level, tape action, message opening digger, and a ladder. These devices will aid you precisely measure, reduce, and put together the pergola elements.
Bear in mind to look at this website use security equipment such as handwear covers, goggles, and a hard hat during the installation process. By gathering all the required products and tools beforehand, you can make sure a reliable and successful pergola setup.
Install the Pergola Posts
The initial action in installing the pergola is to firmly set the messages in the ground. To start, you will need to figure out the layout of your pergola and mark the places where the blog posts will certainly be set up.
The deepness of the holes will certainly depend on the dimension and height of your pergola, as well as the kind of dirt in your location. It is vital to make certain that the openings are evenly spaced and aligned with the layout of your pergola - Pergola Installation.
As soon as the openings are dug, it is time to install the articles. wikipedia reference Begin by placing a post in one of the holes and make use of a level to make certain that it is completely plumb. You can make use of temporary supporting to hold the article in location while you deal with the various other blog posts. Repeat this process for every message, making certain they are all level and aligned with each other.
Nevertheless the site here messages remain in area, it is crucial to fill up the openings with concrete to protect the posts. Mix the concrete according to the producer's guidelines and pour it right into the holes, making certain it totally fills up the area around the articles. Make use of a trowel to smooth the surface of the concrete and get rid of any kind of unwanted.
When the concrete has actually healed, which typically takes regarding 24 to two days, the articles will be safely embeded in the ground and all set for the next step of the pergola setup process. - Pergola Installation
Connect the Pergola Beams and Rafters
Once the posts have actually been firmly established in the ground, the following action in the pergola setup process is to connect the rafters and light beams. This action is crucial as it will offer the structure and support for the pergola, ensuring its security and durability.
To begin, you will certainly require to note the location and gauge of the light beams on each blog post. This will certainly guarantee that they are evenly spaced and aligned. Using a degree, make certain the light beams are completely straight prior to securing them to the posts.

To connect the rafters, use galvanized screws or brackets, ensuring a secure link. It is recommended to pre-drill holes to stop splitting. Beginning at one end and function your way throughout, ensuring each rafter is properly lined up and affixed.
As soon as all the beam of lights and rafters are safely affixed, you can continue to add any extra components to improve the appearances and performance of your pergola, such as lattice panels, color fabric, or hanging plants. With the beams and rafters securely in area, your pergola is currently prepared to supply a stunning and functional outdoor room for you to appreciate.
Conclusion
Finally, installing a pergola can be a straightforward process when following a step-by-step overview. By choosing the ideal design, preparing the outdoor area, collecting the needed materials and devices, and appropriately mounting the blog posts, light beams, and rafters, you can boost your exterior room and produce a beautiful and practical pergola.
Enhancing your outdoor area with a pergola can bring a touch of elegance and harmony to your home. A pergola is not simply a decorative structure; it offers a function in enhancing your outside room.To make certain a successful pergola installation, it is critical to effectively prepare your outdoor room.After appropriately preparing your outdoor space, the next step in the pergola installation process is to gather all the essential products and tools. Pergola set: Pick a pergola kit that suits your design and exterior space.